Crevasse Rescue Next Steps
Now that you have completed your crevasse rescue course it’s time to think about how to put your new skills to use. Here is some advice on what you need to do to keep learning about being safe on glaciers.
Learning resources
Use the following resources to help you learn more:
The Association of Canadian Mountain Guides publish a series of technical manuals that are available for purchase. The skills I taught are based on those covered in the Ski Guide and Climbing Guide Manuals.
Petzl has a great series of Tech Tips. They also have excellent product specific materials and a series of e-books on various gear and safety topics under the Tech Tips menu item.
Be a little bit careful of information you find on YouTube and other sites. Make sure any tutorials you view are posted by a reputable person or organization, most of them are not great and have numerous errors. I found this video posted by the Alpine Club of Canada which shows systems used by Canadian guides. The presenter, Doug Latimer, is a friend of mine and knows his stuff.
Safety Equipment
Here is a list of the safety equipment I carry for crevasse rescue:
Harness. One that is designed for the activity you are doing is best (mountaineering, skiing).
One triple action locking carabiner with a captive eye (or two regular locking carabiners) for attaching the rope to your harness.
6 locking carabiners.
2 D-shaped non-locking carabiners (to create a Garda hitch in case you drop your Micro Traxion).
Mini-, Micro-, or Nano Traxion.
Tibloc.
Pulley.
1 - 2 prussik cords, 5m x 6mm.
1 short prussik cord, 1.5m x 6mm (or Hollowblock)
1 - 2 nylon or Dyneema slings, 120cm.
Tube style belay-rappel device.
1 - 2 ice screws with V-thread puller.
Avalanche probe.
Shovel (only required for winter glacier travel).
1 - 2 ski straps (if using skis for the anchor).
Practice your Skills
It’s extremely important to continue to do additional self-directed training. Start by practicing simple systems in realistic scenarios:
Use “live” loads, full body weight. Make sure you use a spot where a fall due to a failure in the system will not have consequences.
Start with a tractor pull.
Move on to the drop loop.
Then try the z-pulley.
Read the manual for specialized equipment you may be using.
Be well practiced with thicker ropes (9mm or more) before trying out lightweight rope systems.
Seek out further training before trying more advanced methods such as rappelling into a crevasse and then climbing the rope back out.
Find a mentor
Gaining experience is an important next step but doing so safely can be tricky. It is important that you find someone to learn from in the field. This person should have more training and experience than you do. Ski patrollers, guides, or guides in training with professional level training would be best. Or someone who has been traveling in the mountains a lot even if they don’t have a higher level of training.
find a group
It is also important that you find a group with a similar attitude and risk tolerance as you. Don’t go on to a glacier with just anyone. Make sure they are compatible with your approach.
trips
Once you get these skills dialled get out on some glaciers.
Your first tours in higher risk terrain should be with people more experienced than you, who you know and trust. Not some random person you met in the bar who said they had lots of experience!
Some good summer mountaineering objectives to start on are:
Peaks accessible from any of the huts on the Wapta Icefield.
Mt McArthur in the Little Yoho Valley.
Mt Rogers, Youngs Peak, or peaks near Sapphire Col (all in the Rogers Pass area).
Boundary peak from the North Glacier.
Glacier conditions can change radically and rapidly in the summer. Many of the objectives above may be unreasonable for beginners after mid-July many years.
Some good glacier ski tours to start on could be:
Peaks accessible from the huts on the Wapta Icefield.
Little Crowfoot Peak.
Further related training
The following are courses you should consider taking to help you learn about some other aspects of backcountry travel. BanffLife/MountainLife offers these types of courses.
First aid
Navigation
Weather
Advanced Companion Avalanche Rescue
AST 1 and 2
Glacier Travel
Advanced Crevasse Rescue
Other advanced training
The safest way for recreationalists to learn more is to organize a group and hire a guide to put together a training programme that includes advanced crevasse rescue systems and glacier travel in more challenging terrain and conditions.
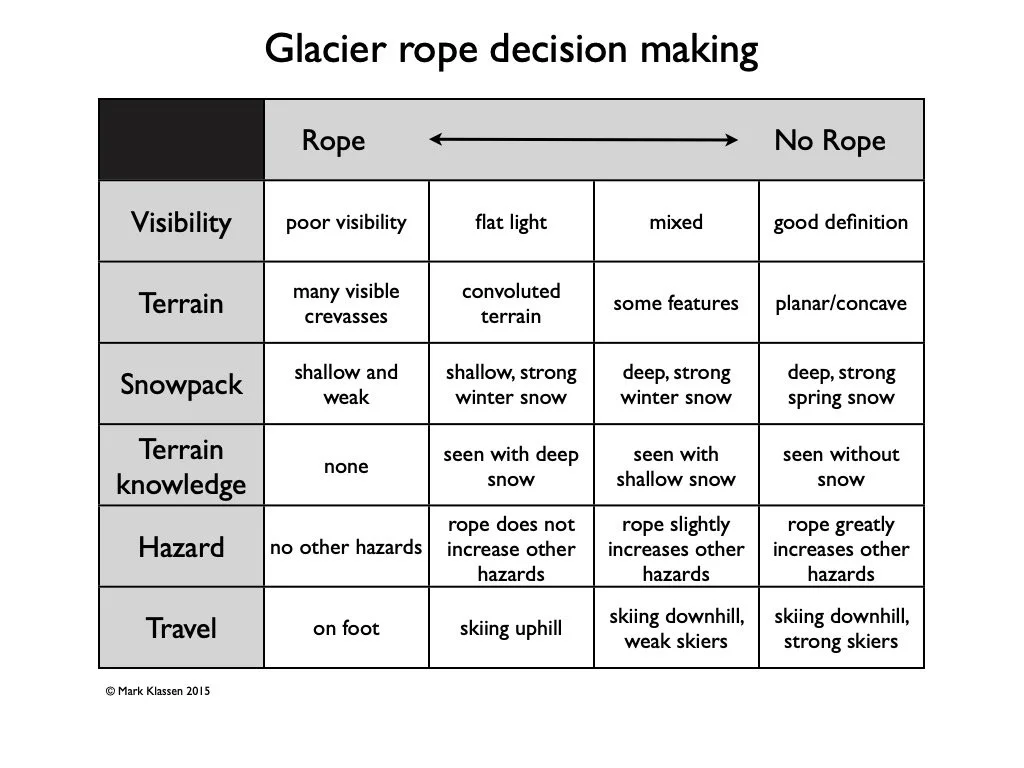
use the rope!
You may see other people not using the rope on a glacier. Don’t follow their example. The rope should be used at all times when traveling on a glacier. The only exception is skiing downhill after meeting the following criteria.
See below for a decision making matrix for skiing unroped on a glacier. Remember, this decision needs to be taken very seriously!